Welcome to the Revolution

Hi there, welcome to my blog - La Revolution Deux. It's an odd name - but I like it! Here you will find all the info on my various DIY Guitar effects builds, amplifiers and guitars. Everything from a humble Ibanez tubescreamer to the holiest KLON Overdrive.

You may also find a few effects builds that I am looking to move on - usually in exchange for other effects/gear/cash. You can always check my ebay account to see what I've got up for grabs.

Have fun, enjoy the blog - Fred Briggs :-)

CONTACT ME


Feel free to get in contact with me about anything you see on this blog or with any general questions about guitars, amplifiers and effects, I'll be happy to answer! Just click the button above to email me directly or alternately my email address is fredbriggs2007 [at] googlemail [dot] com

Search This Blog

Wednesday 30 January 2008

L'Overdrive de la Révolution Deux

Here is a short photo essay detailing the build of my very own LORD pedal, a design I came up with dedicated to the Freestompboxes forum. It's a design capable of emulating great amp-like tones, with a great dynamic range. Tuck in, read and enjoy! Any questions? Fire away.

-EDIT-
A few people have asked me what the LORD sounds like, I'd say like a cross between a Marshall and a Mesa, it can get slightly higher gain than a standard Marshall but not quite as hot as a Mesa on 10!

--EDIT 2--
Try running the LORD at 9v, 12v and 18v for a nice variation in sounds. The higher the voltage the more 'open' and less compressed the tone gets. The higher voltage also makes the circuit even more touch responsive!

As you can see the basic circuit structure is a mosfet gain stage running into two cascaded Jfet stage with a tone control in between the mosfet and jfet stages. I placed the tone control here because I wanted it to alter the harmonic structure of the clipping fet stages. You can really alter the sound of the LORD by modding the tone section, it's worth playing with.

***DISCLAIMER***
The LORD is not a subtle sounding pedal when at full gain. Windows will rattle, ears will sear and any neighbors/front row audience will lose any fillings they posess. At lower gains the LORD can be used to get subtle breakup or just to boost your signal - the choice is yours the LORD is your tool.

1) The Schematic
First is the updated scheme. In my build I used a 100n cap on the source of the first fet and I used the "alt tonestack". I also added a "voice" switch which adds in a 4.7n cap across the 4.7n output cap I used for the mosfet stage (instead of the 10n stated), it essentially changes the bass response of the circuit from stock to what I call "thin".

You may want to tweak the caps about a bit to suit your gear. Alter the high frequency roll off points at the two Jfet stage e.t.c, experiment - play until it sounds how you like it!

2) The Breadboard

Here's the little sucker on the breadboard, testing was completed and confirmed that the little bugger made one hell of a racket - mission accomplished! (Note the cigarette burns on the carpet! Ooops!)

3) The Enclosure

I decided that "L'Overdrive de la Revolution Deux" needed a special enclosure (Read as; I was skint and didn't want to spend any cash buying a new hammond case!) I took the case from an old bust Ibanez phaser and modified it to my tastes.

4) The Enclosure Continued

A quick picture of the innards in place, you can see the squeeze I got into, having to slot that 3PDT in there was almost an error. The original footswitch will be used as a little "bonus feature" 8) Note the tone bypass switch and the voice switch (which is lying at the side of the enclosure!)

5) The Circuit
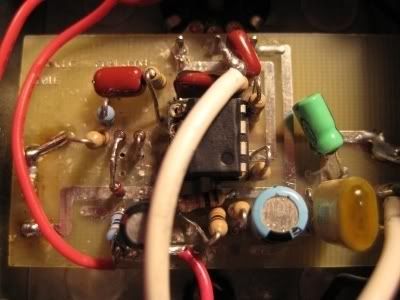
I decided, for the extra mojo, to build the circuit point-to-point on perfboard. Here it is, layout completed and ready for the wires to go on! Note the two trim pots used for biasing the FET's to the correct voltage - very important!

6) Wiring and Test


After I wired all the controls in place I fired the circuit up for debugging, as usual there was no errors at all :wink: All of the wiring was kept as short and neat as I could be arsed with!

7) Installation

Next I had to install the circuit into the enclosure. Nice and neat :wink:. There is a prize for the first person who can tell me what I used the original footswitch for!? I was going to put a battery connector in there but I couldn't be bothered - I don't have any spare batteries, aparently we need those for the "Smoke Alarm".... Pfffft.

8) All Finished

Looking Good!

Still looking good.


So there it is, the finished article. One hell of an overdrive :wink:

Give it a try, you wont be dissapointed - "L'Overdrive de la Revolution Deux" is a crowd killer! Please, if you do build it, be sure to give feedback on how it sounds - what gear you are using it with etc....

Marshmellow over at Freestompboxes was kind enough to layout a PCB for the LORD project. If you want to use the alt tonestack, as I did in my build, you can easily make the slight changes that you need to!


Here is a great vero layout done by the vero master - Torchy! Thanks so much for this Torch!


Lovestuff Ecstacy Overdrive

The Lovepedal Eternity is one of the most hyped overdrive pedals around at the moment - it offers a great "clean boost" and some classic lead tones. With the current dealer price around $300 and ridiculous ebay prices too, this was another target for the [K]loners.

Like many boutique pedals the Lovepedal Eternity uses a layer of black epoxy "goop" to stop potential kloners seeing the circuit board. Luckily it's not too difficult to remove. I've seen a number of "de-gooped" Eternity's and it turns out to be nothing more than a modified version of Jack Orman's "Son of a Screamer" overdrive (Although it does still sound very nice!) circuit which is basically a minimal version of the age old Tubescreamer overdrive.

Ok, on with the build:

Here you can see the enclosure which has been marked and drilled out ready to take the hardware. What are those 4 small holes on the side for? Well, wait and you will soon find out!


Here I'm just checking everything fits into place - note the 4! LED's down the side of the unit. It is the same on the other side, a nice change to the regular single LED status indicators.

Instead of painting the Eternity I decided to have a go at etching the enclosure with Ferric Chloride Acid. Here you can see the cleaned enclosure and transfer, which is just laser printer toner on glossy magazine paper, ready to be ironed together.

Here is the etched enclosure - Unfortunately I forgot to take pictures of the etching process, silly me. Anyway - it looks great. I decided to call my pedal the "Lovestuff - Ecstasy Overdrive" ;-)

Hardware mounted and internal wiring underway. Usually the guts of Lovepedal's aren't the neatest, I wanted mine to be much neater internally than the actually Eternity pedal I had seen :-0

Instead of creating a PCB for this build I decided to create the Eternity on perfboard. It is, therefore, wired point to point - this means there is more "Mojo" included in the circuit (I also used solder made from ground Unicorn horn and the wire is carefully wound from the hair of Mermaids. Top quality stuff for all that added mojo and tone!)

Here the Eternity is nice and snug. Ready for the final internal wiring to take place.

A finished Lovepedal Eternity, err, I mean Lovestuff Ecstasy Overdrive!

The finishing touch, a custom signed base plate! Pedal Pirate forever!

Here's a finished picture - all plugged in and working! Looks good doesn't it :)

Here's another - still looking good. The controls are: Top left = "Drive", Top Right = "Level" and the lower middle is "Glass" (as it is labeled on the original Eternity, it is actually just a standard tone control).

Now you see why I wanted to use all those LED's! How great does that look? Notice that I changed some of the red LED's to yellow ones for even more mojo!

So there it is - a DIY clone of the popular Lovepedal Eternity overdrive pedal. What does it sound like? Well, it sounds just like all the sound samples of the Eternity, a great overdrive tone.A great thanks to all those who made this project possible - you all know who you are...For more information on this project feel free to email me, you can find my address at the top of the page.

By popular demand - The Lovepedal Eternity "Burst" edition Schematic & Layout (thanks to LovePedalDetective for the layout):


Also a De-Gooped Lovepedal Eternity (From LovePedalDetectives album :-) :

Here you can clearly see it's just a Son Of a Screamer circuit :-( If you want info on the other variations of the Lovepedal E get over to freestompboxes.org and search for the Eternity thread - there is loads of good stuff there.

Tuesday 29 January 2008

KLOWN Centaur


*UPDATE* For fully up to date schematics and layouts of the original Klon we, at freestompboxes.org, bought to reverse engineer please check out freestompboxes.org . Thanks to Soulsonic we have a great project on the way too :-)

Demo Video;


The KLON Centaur, one of the rarest and most sought after overdrive pedals currently available. With current production models costing in excess of $320 and ebay prices in the $500 range the Klon Centaur was a great candidate for reverse engineering. The schematic has been available for some time in closed circles but many are reluctant to share the information about the Klon Centaur freely until recently when a few guys got together and really made things happen. Great work and many thanks guys, you all know who you are!

So, what did I think of the Klon Centaur when I first saw the schematic? Well, it certainly isn't a tubescreamer or other common overdrive clone. It truly is an original circuit which utilizes some great ideas.

The Klon basically splits the signal into 3 parts - highs, mids and lows - the mid and low sections are "eq"ed and the highs are run through an overdrive circuit before the three parts are mixed back together again with an opamp mixer section - which is run off a charge pump supplying a dual polarity supply to stop any further clipping taking place. As the gain is increased the level of mids and lows present in the final mix is reduced, this is controlled via a dual taper pot which simultaneously increases the overdrive gain and reduces the level of the mid and low sections. The tone control is an active treble boost/cut allowing the level of the highs to be adjusted to taste.


Here you can see the copper clad PCB board after I printed the PCB trace onto "glossy" paper (Taken from a magazine I found lying around!) using a laser toner printer. I then ironed the print out onto the copper board until it was firmly stuck down. Next I soaked PCB board with attached paper in water until I could easily rub the paper away with my finger. As you can see this leaves the PCB trace attached to the copper board.

Here is the PCB before it is trimmed down and placed in the Ferric Chloride etching solution. You can see some small fills that I made with a permanent marker.

Here's the PCB in the Ferric Chloride. Etching away! This can take from 15 minutes to an hour, depending on the strength and temperature of the etching solution.

The finished PCB, cleaned with steel wool, trimmed and drilled. Now it's ready for population!

The PCB being populated. I need a box to put this thing in. I wonder what it should look like?

A nice Hammond BB Sized enclosure - marked out and drilled. It looks boring - I need some graphics!

I applied the graphics in the same way that I did the PCB toner transfer. Here it is ironed on and soaking through ready for the glossy paper to be removed.

Here's the enclosure with the graphic applied. A nice centaur image - just to keep the theme going!

So, enclosure drilled, graphics applied, PCB etched and populated and wiring done. I've got myself a Klon Centaur! See the finished unit below :-)

For your comparison here are some images of a real Klon Centaur. I really do like the look of these things. Nice and simple!


So there you have it. A DIY construction of the rare and famous Klon Centaur Overdrive. How does it sound? Just like a real Klon Centaur, nice booster - OK overdrive. I think to be a really great booster and overdrive it needs a few mods. In the near future I will be constructing my own version of the Klon circuit with these mods:

  • Separate Gain and Blend pots (The original uses a "dual ganged" pot instead of two individual pots to control the mix of clean signal and overdriven signal.
  • Improve the overdrive circuit - that overdrive section could easily be made to sound a little sweeter and a little less "thin" - this is a complaint which I have heard from many Klon Centaur users.
  • Diode blend pot - to allow you to blend between two distinct overdrive sounds. It just increases the versatility of the original unit.
  • Use a different OPAMP for the buffer/overdrive section. Why use that TL072 for the overdrive section? Why, why, why? I've been using a LF353 and it sounds better already! True Bypass?
The schematic below was produced by fully reverse engineering a true Klon, that we bought at freestompboxes and then butchered (By our very own Soulsonic)...


Here's a vero layout;


Here is Madbean's great project (schematic and PCB layout): http://www.madbeanpedals.com/projects/Sunking/docs/Sunking_ver.3.pdf
I've built quite a few from this layout and they sound great.

For more info on this project or to buy one of the 100,000 Klown Centaur pedals I have since made please email me. You can find my address at the top of the page... Again; thanks to everyone who has made this build possible - you know who you are, especially MM and MC ;-)